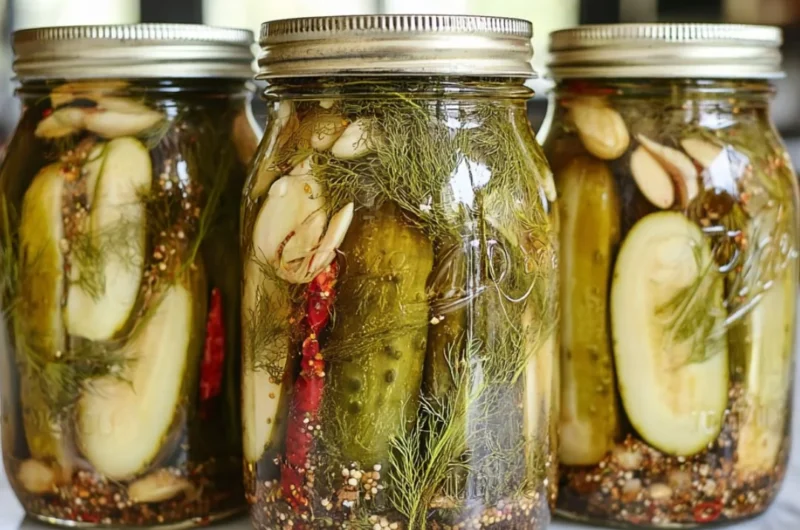
Killer Spicy Garlic Dill Pickles Recipe
As the golden light of late summer begins to fade, my mind drifts to the crisp, tangy bite of homemade pickles. There’s something so cozy about the ritual of pickling, a cherished tradition that has been passed down through generations in my family. I remember the fourth of July picnic with my grandmother where her spicy garlic dill pickles stole the show — everyone clamoring for that extra crunchy bite! This easy DIY recipe for Killer Spicy Garlic Dill Pickles not only brings those nostalgic flavors rushing back but also allows you to savor summer well into autumn. Trust me, this is one you’ll definitely want to pin for later!
Why You’ll Love This Recipe
Easy to Make: With just a few simple steps, you can create a batch of delicious homemade pickles without fuss.
Bold Flavors: The combination of spicy hot peppers, fresh garlic, and aromatic dill delivers a flavor punch in every bite.
Perfect for Gifting: These pickles make a thoughtful present for friends and family who appreciate homemade goodness.
Healthier Alternative: Ditch store-bought options that are packed with preservatives and enjoy a fresher, healthier version.
Versatile: Enjoy these pickles on burgers, sandwiches, or as a crunchy side with your favorite meals.
Ingredients You’ll Need for Killer Spicy Garlic Dill Pickles
For a delightful jar of pickles, gather these simple ingredients:
- Fresh cucumbers (pickling variety, if possible)
- Fresh garlic cloves
- Fresh dill, or dried if you don’t have access to fresh
- Hot peppers (I love using jalapeños for the extra kick!)
- Pickling spice (store-bought or homemade)
- Vinegar (white vinegar or apple cider vinegar works well)
- Water
- Salt (pickling salt or kosher salt is best)
How to Make Killer Spicy Garlic Dill Pickles
Let’s make it together! Follow these sensory-rich steps to create your batch of crunchy deliciousness.
In a large pot, combine 1 cup vinegar, 1 cup water, and 1 tablespoon salt to create the brine. Bring to a gentle boil, and let those aromatic scents fill your kitchen.
While the brine is heating, take your sterilized jars and pack them with fresh cucumbers, garlic cloves, sliced hot peppers, and a tablespoon of pickling spice. Feel free to layer them beautifully, making each jar a colorful tribute to summer’s bounty.
Once the brine is boiling, carefully pour it over the packed jars, making sure all ingredients are submerged. The heat hits the garlic and dill, releasing their fragrant oils.
Seal the jars tightly and let them cool at room temperature for about half an hour. The anticipation builds!
Finally, place the jars in the refrigerator and allow your pickles to sit for at least a week. Patience is key here, as the magic happens with time, allowing the flavors to develop and meld.
Fun Ways to Customize It
Why stop at classic flavors? Here are some delicious variations to try for your pickles:
Zesty Lemon Dill: Add some lemon slices or zest for a refreshing citrus twist that brightens the flavor profile.
Sweet & Spicy: Incorporate a tablespoon of sugar into your brine for that perfect balance of sweetness with fiery heat.
Garlic Lovers: Feel free to double the garlic cloves for those who can’t get enough of that lovely pungent flavor!
Herbed Delight: Consider adding other fresh herbs like thyme or oregano for a unique herbal experience that’s equally enticing.
Chef Emma’s Helpful Tips
Make-Ahead: These pickles get better with time! If you can wait, try to let them sit for two to three weeks before indulging for more intense flavors.
Storage: Keep your pickles in the refrigerator, and they should last for about 1-2 months, although they’re usually gone before then!
Slicing Tricks: For uniform cuts and to maximize crunch, try slicing your cucumbers vertically into quarters or spears.
Flavors to Experiment: Feel free to swap out the hot peppers based on your heat preference or even try using different types of vinegar for varied taste.
What’s Inside – Nutrition Breakdown
Each serving of these tasty pickles (about 1 ounce) contains:
- Calories: 10
- Carbohydrates: 2g
- Sugar: 0g
- Fat: 0g
- Protein: 0g
- Sodium: 300mg (varies based on salt used)
Frequently Asked Questions
Can I make this ahead?
Yes! The longer the pickles sit, the better they taste. Allow at least a week for the flavors to fully develop.
Can I use different ingredients?
Absolutely! Feel free to swap out cucumbers for other vegetables like green beans or carrots.
How do I store leftovers?
Simply keep them in the jars and refrigerate. Make sure the pickles stay submerged in the brine.
How long does it last?
These pickles will last about 1-2 months in the fridge, but they’re likely to be devoured well before then!
A Cozy Closing Note
There’s something magical about a jar filled with crispy, spicy garlic dill pickles; each bite is a delicious reminder of summer’s embrace. They enhance a family meal or make a delightful addition to any picnic table. Save this Killer Spicy Garlic Dill Pickles recipe to your DIY pickling board so it’s ready when you want to enjoy that cozy seasonal treat! Happy pickling, friends!

Killer Spicy Garlic Dill Pickles
- Total Time: 25 minutes
- Yield: 4 servings 1x
- Diet: Vegetarian
Description
Homemade spicy garlic dill pickles that are perfect for savoring summer flavors well into autumn.
Ingredients
- 4 cups fresh cucumbers (pickling variety, if possible)
- 4–6 fresh garlic cloves
- 1 bunch fresh dill (or 1 tablespoon dried dill)
- 2–3 hot peppers (jalapeños recommended)
- 1 tablespoon pickling spice (store-bought or homemade)
- 1 cup vinegar (white or apple cider)
- 1 cup water
- 1 tablespoon salt (pickling or kosher salt)
Instructions
- Combine 1 cup vinegar, 1 cup water, and 1 tablespoon salt in a large pot to create the brine. Bring to a gentle boil.
- Pack sterilized jars with fresh cucumbers, garlic cloves, sliced hot peppers, and a tablespoon of pickling spice.
- Pour the boiling brine over the packed jars, ensuring all ingredients are submerged.
- Seal the jars tightly and let them cool at room temperature for about 30 minutes.
- Refrigerate the jars for at least one week before enjoying, allowing the flavors to meld.
Notes
These pickles improve with time; let them sit for up to three weeks for more intense flavors. Store in the refrigerator for 1-2 months.
- Prep Time: 15 minutes
- Cook Time: 10 minutes
- Category: Condiments
- Method: Pickling
- Cuisine: American
Nutrition
- Serving Size: 1 ounce
- Calories: 10
- Sugar: 0g
- Sodium: 300mg
- Fat: 0g
- Saturated Fat: 0g
- Unsaturated Fat: 0g
- Trans Fat: 0g
- Carbohydrates: 2g
- Fiber: 0g
- Protein: 0g
- Cholesterol: 0mg